
Ryobi tools are known for offering its users a wide range of power tools that can be used to complete numerous tasks. The devices are equipped with unique features that make them amazing. Although, when trying to decide which tool to get, people can easily get confused.
One easy way to prevent this is by going through the specifications for these tools. With that being said, people should note that the newer lineups from Ryobi are now all cordless.
So, you’ll get more control and convenience out of these units when comparing them to your traditional options.
Fixing Ryobi Battery Stuck On Testing:
These are powered up using lithium-ion batteries that can last users a long time. Though, there are also some issues that you can run into with the batteries on these power tools. This is especially true if you’re not keeping track of the basic maintenance.
Recently, people have been complaining that the battery on their Ryobi is stuck on testing. If you are getting the same problem, then going through this article should help you in getting rid of it.
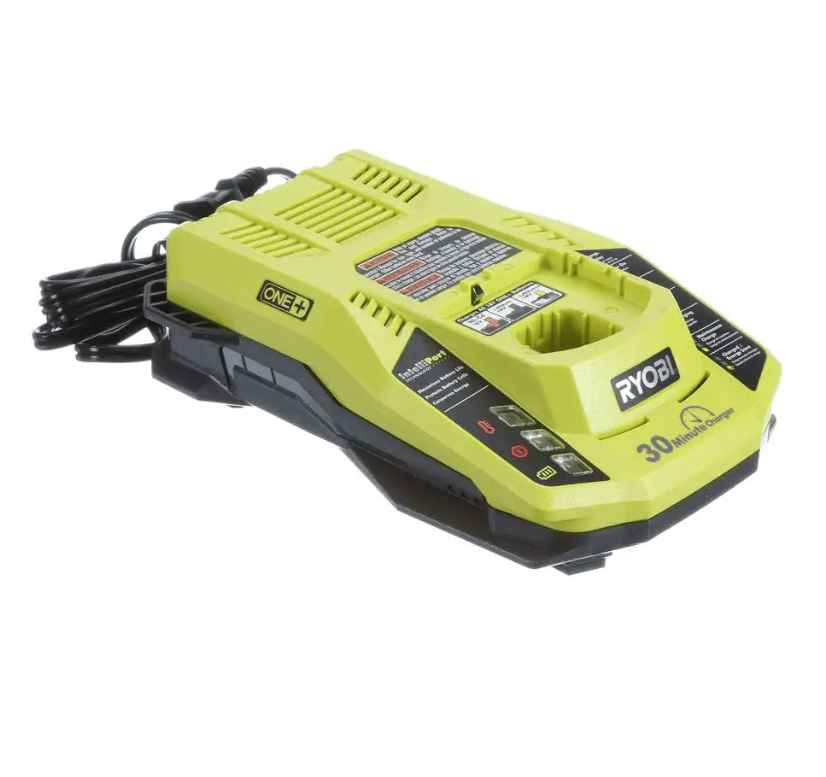
- Charge The Battery Again
The lithium-ion batteries used by Ryobi usually monitor the activity of its users so that they can use their power efficiently.
However, in some cases, the battery might get stuck in a loop that causes it to sleep. If this happens then, the battery will be stuck on testing, which can be quite annoying.
Several methods can be used to fix this, but the easiest thing that you can try is charging the battery again.
Make sure that you plug it inside the charger for about 30 minutes and then try using it again. You will notice that your battery should now power up without any more problems.
- Battery Might Be Overheating

If you are still getting the same issue, then there is a slight chance that your battery might be overheating.
This usually happens if you have been using the device for a long time without any rest. Hence, people can simply leave their power tool and battery to cool off.
It is always better that you remove the battery from your device and then wait for it to cool down. This is because the battery can then come in contact with air, allowing it to decrease its temperature.
Once the batteries cool down, people can then plug them back inside the power tool and test them.
- Try Jumping The Battery
Sometimes, all that you need to do with the battery is to jump it with a fresh unit. You will not be able to get any response out of the unit when you have a habit of using the battery past the 20 percent charging status.
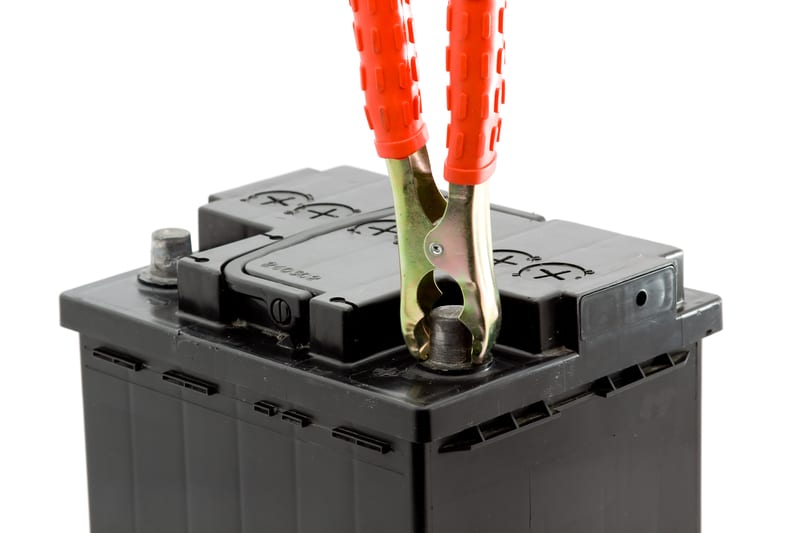
So, if you’re in this situation as well, we will suggest that you jump the battery with a charged one. All that you will need to do here is to grab a fresh pack and then use a pair of wires to connect the fresh pack to the discharged battery.
Keep the terminals connected for about 20 to 30 minutes, and you will be sorted in no time. From there, you can put the battery back inside the charger and then check up on the response from the charger.
If everything goes well, you will be sorted at this point and won’t have to deal with more errors.
However, you will still need to make sure that the placement of the battery is optimal. Otherwise, there will be no charge that can flow from the charger into the unit. So, be sure to keep track of these pointers when you’re stuck in the same errors.
- Check Contact Points
Here, you need to check the contact points on the battery as well as the charger. All that you need to ensure is that the contact between the terminals of the battery and the charger is optimal. Many owners ignore these pointers and end up confused as to why the battery is stuck on testing.
There is a ninety percent chance that only one of the terminals is making contact with the charger, and you’re not able to secure the connection properly. So, if you’re stuck in this issue as well, we suggest that you address the situation immediately.
All that you need to do is remove the gunk and debris lodged in the unit by using compressed air. You can easily blast away the clogged debris and then check up on the response from the main unit one more time.
If everything goes well, you will be sorted right here and won’t have to deal with more errors down the road. So, be sure to keep track of the maintenance side of things, and you will not have to deal with the same complications when charging the battery.
- The Issue Might Be With The Voltage
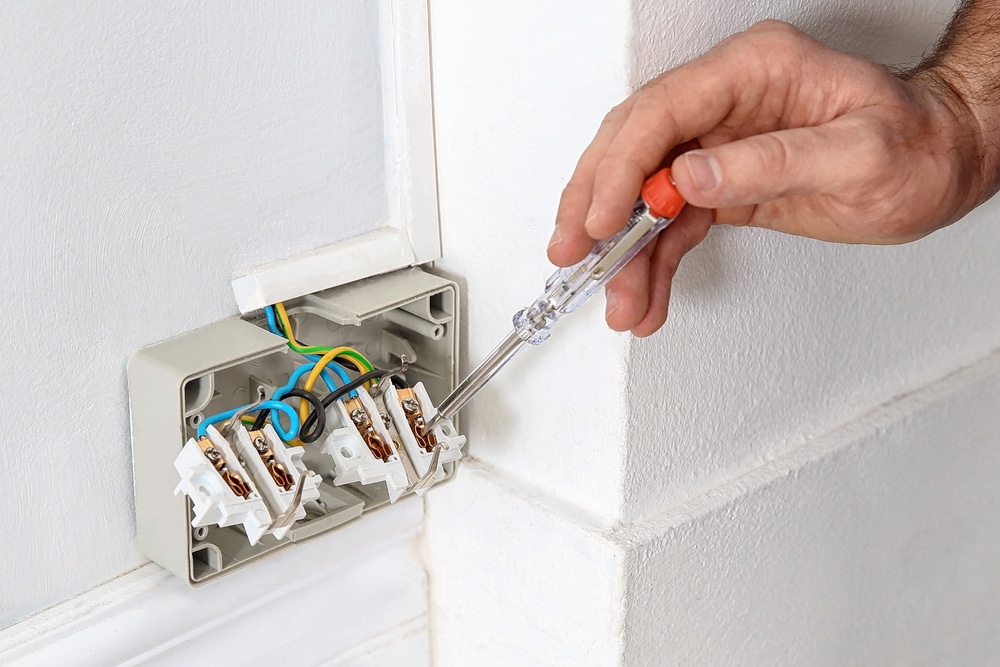
Next, you need to also assume that the issue is with the voltage. The quickest way to check for voltage-related issues is by using a different outlet. It will take a bit of time, but you will surely be able to isolate and address the issues with the power.
However, if the power connections are in poor shape and the theme of insufficient voltage is consistent in your devices, then you will not be able to get anywhere with the unit. You will keep struggling with this device, and the response from the system will be sub-par, to say the least.
In this situation, we suggest that you hire a local technician to help with the power connections.
You will not be able to fix these points yourself, and seeking help from a local will always make your life easier. Once you’re through with the adjustment, you can try changing the battery one more time.

Your focus here should be on making sure that the power going into the system is optimal and that there are no issues on that end.
It will take a bit of your time, but you’re not left with many choices. Moreover, having poor power connections can create several safety concerns in your house.
- Clean Up The Unit
Sometimes, a quick clean up of the battery, as well as the charger, will have you sorted. Over time, gunk and moisture can build up on the contact points. This is especially true if you don’t store the battery properly and the cover is a bit damaged.

So, if you’re in this situation and the unit is not clean, we suggest that you clean it up. It will take a bit of effort on your end, but you’re not left with many options here.
All that you’re trying to do is to make sure that the debris and other foreign particles are not interrupting the power flow.
That will be more than enough to have you sorted, and you will not have to deal with more errors on your end. Hopefully, that will be it, and you will be sorted in no time.
- Batteries Might Be Faulty
Finally, one more reason for this problem is that your batteries might be faulty. This usually happens when you have been using the product for a long time.

Lithium-ion batteries can start losing their charge after a few years, but this mostly depends on how frequently you use them.
The batteries will most likely cause issues like these once they run out of charge, which is why you should replace them.
If people are getting this issue after a few months of purchasing the batteries, then they can also claim the warranty service.
This should help them in getting a free replacement, as this is covered by Ryobi. On the other hand, if you are out of warranty, then make sure that you get your batteries recycled.
Wrapping Up

There can be a ton of things to consider when the Ryobi battery is stuck on testing. So, you will have to spend a bit of time trying to narrow down the issue with this system.
Hopefully, you will be able to isolate the issue with the charger or the power supply, and you won’t have to go through much hassle.
On the other hand, if you’re still stuck in these issues after going through the fixes listed above, then there is a chance that the battery is defective. The only viable solution, in that case, is to get a new battery, and you can’t rely on any quick methods to sort you out.
It all comes down to how you’re planning on addressing the situation, and seeking help from the official support team will never be a bad idea.

So, be sure to reach out and explain your end. You will surely be able to secure a response within a few hours.
Lastly, as long as you’re sure that the hardware of the battery itself is in good shape, the issue is more related to the maintenance side of things.
So, try checking the contact points, adjusting the placement, and making sure that nothing is damaged when you’re stuck in these issues.