
If we’re being honest, we could all benefit from improved ways to handle our tools. The wide variety of pliers, wrenches, and screwdrivers may frequently make it difficult to complete a DIY job properly. Yet, having organizing choices, such as a pegboard, might make your life easier.
You will not believe how much time I had to spend sorting my tools every weekend when I first got into woodworking. However, getting some command strips along with a pegboard made my life much easier. This doesn’t only keep my hand tools secure, but I can quickly speed through most projects.
One tricky thing that still annoyed me a ton was figuring out how to hang pliers on a pegboard. While most people used a rail system or a toolbar to hang the pliers, I much prefer the use of a shelf to better organize my tools. So, you can follow through with the same method.
Yes, using command strips or even magnets will be easier when you’re using smaller tools. However, if you’re new to the game and need better engagement, then going with the shelf method is the right idea. That will be much better for you in the long run.
How To Hang Pliers On Pegboard?
The best method that I’ve found on how to hang pliers on the pegboard is by using a wooden shelf. You can use a sheet to create a DIY shelf and create a holding arm that will keep your pliers in an upright position. You can then mount the shelf on your pegboard or wooden frame to sort out your tools.

Best Method — Hanging By The Handle
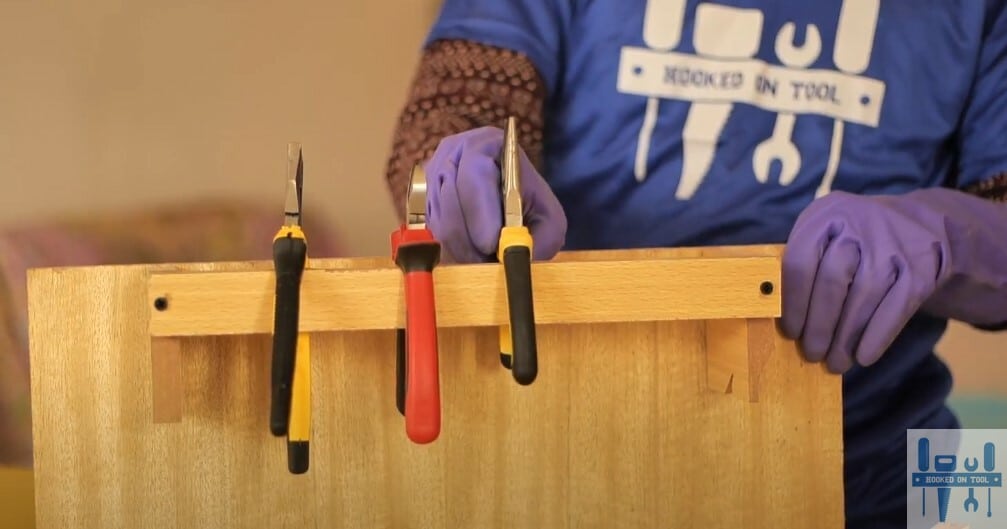
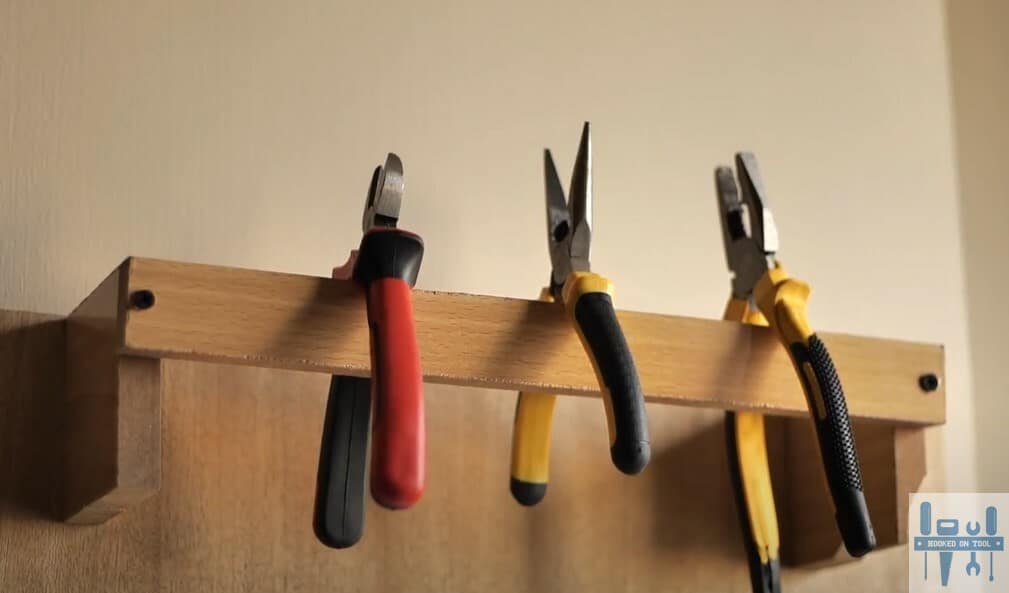
The simplest yet most effective way of hanging the pliers is by the handles. The length of the handles is always larger when you compare them with the plier jaws. Hence, the best thing to do here is to open the handles (which will also open the jaws) and set the pliers on the holding arm.
Sounds simple, right? Well, it is not! You have to mind the alignment as well as the weight. If you’re using a thin sheet of wood to hold the pliers, then it won’t be able to hold all your pliers. So, be mindful of the weight.
From there, you have to check the alignment as well. The most common mistake that people make when building a shelf is that they will place the holding arm far away from the frame. This distance allows the handles to slip out when the alignment is not perfect.
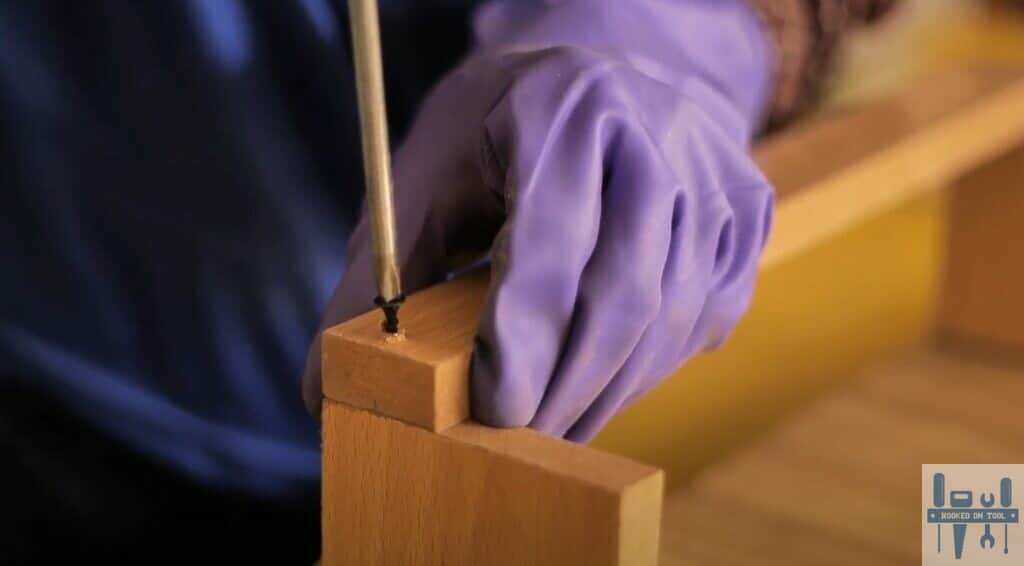
We can all make mistakes, and sometimes you just can’t align the pliers when placing them on the shelf. So, the best thing that you can do is to use a small wooden block to close the gap between the frame and the holding arm. This will help you a ton when it comes to limiting the handle movement.
From there, you can just space out the pliers and have them rest on the holding arm. It might take a bit of adjustment to the shelf at first, but overall, hanging by the handle is the best method when you’re talking about how to hang pliers on the pegboard.
One thing that I will say here is that this method of handing the pliers by the handles is only viable when you’re using pliers with smaller jaws. The larger jaws create an imbalance, and you will not be able to secure them properly on the holding arm.
So have this detail in mind when you do decide to go with a wooden shelf. Everything boils down to how you’re planning on modifying your setup. There is no “one” perfect method for all pliers or all setups. Instead, you have to get a bit creative when managing the organizing system.
There is no harm in browsing through the setups managed by your local experts. That would give you a decent idea on how you can modify or improve your setup to include more pliers and varieties in your pegboard system.
Alternate Methods — Modifying The Shelf/Using Magnets/Testing Hooks & Command Strips
Now, hanging by the handle is the best method when you have a ton of space. However, that is not always the case. There will likely be situations where you will have to get creative and use some other methods like holding clips or using command strips.
Similarly, there are some pliers that have relatively bigger jaws that create an imbalance when you place the pliers by the handle. So, you will have to instead hang the pliers by the jaws when the jaws fit snuggly with the holding arm.
Everything will come down to your specific setup, and there is no single method when it comes to hanging pliers on a pegboard. You can also get pretty creative when using hooks, clips, magnets, and command strips to hang the pliers.
Just don’t get too stingy with one method. If the pliers keep falling off, then it might be time to try out a different method. Sometimes, the heavier pliers can raise some safety concerns where the plier can potentially fall on your feet.
The weight of these pliers is enough to injure or even fracture bones. So, if you have the pegboard mounted higher on the garage wall, then you can’t really afford to work with a weaker foundation. Make sure to also have some foot protection to help keep your feet safe when working.
Note: While I prefer using the “hanging by the jaws” method, it is not always the best. You will have to hassle a bit more with different methods, depending upon the type of pliers and the variety available in your workshop. So, there is no need to stick with one method only.
However, if you’re also working with lighter tools, then hanging by the handles method is the best. The only thing that you will have to be mindful of when using this method is to keep the distance between the holding arm and the frame minimal.
This way, the handle will not slide through the gap when the alignment is not perfect. Other than that, you will not have to worry about anything. Just make sure that the wooden shelf is robust enough to handle the weight of your hand tools.
Similarly, I’ve found that using magnets for smaller accessories also makes the job easier. So, you can do that as well and use some glue or create compartments for magnets. That would help you a ton when you’re talking about sorting your stuff quickly.
The Takeaway
I personally just attach a shelf with my pegboard or mount it directly onto the wall with some nails. From there, I hang the pliers by the handles on the holding arm, and that keeps them suspended. Yes, there are more methods out there, but I’ve found that it works the best for me.
The jaws are relatively small (at least on the pliers that I use), and I don’t have to worry as much about the pliers just sliding out of the holding arm because of the imbalance. One thing that did annoy me, however, was that I created a huge shelf that required perfect alignment.
Needless to say that this shelf didn’t last a long time, and I quickly switched to a different option. Using the smaller shelf didn’t only help me organize the pliers, but I had a bit more flexibility when you talking about weight management.
However, if you’re unable to figure out the best method for your pliers, then I’ll suggest that you head over to your local workshop. Get into contact with the local experts and figure out how they sort out their pliers. That way, you can get some creative ideas that are also practical for your specific setup.