Dremel is one of the most dominant brands on the market, and you will not find any other option that can compete with its rotary tools.
This is especially true for first-time owners that don’t know much about specialized tools and need a decent unit while still remaining on a budget.
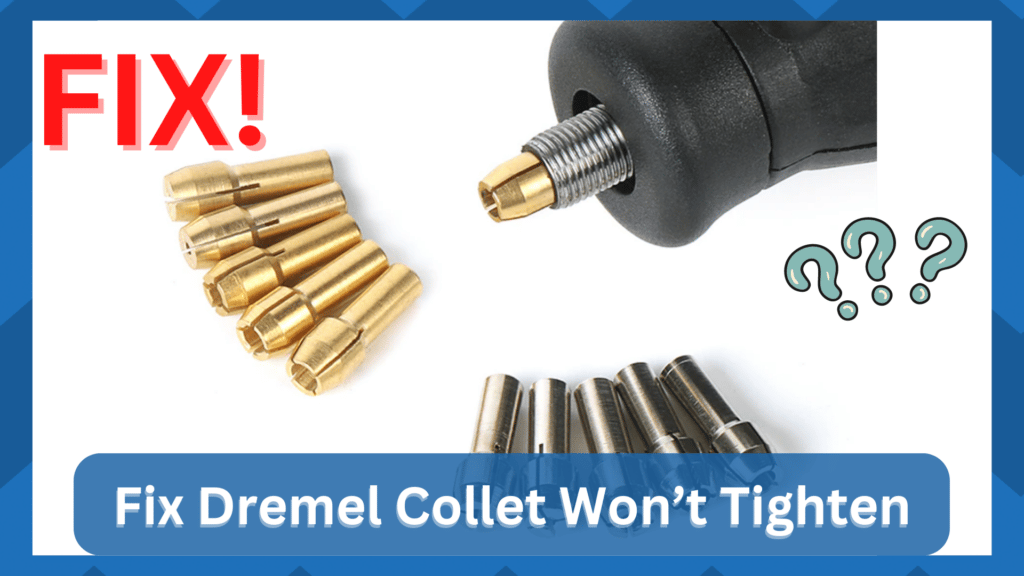
If you are a Dremel user, we are sure you’ve come across a time when the Dremel collet won’t tighten.
For those who don’t know, the collet is one of the most effective ways of holding the Dremel, especially when it is operating at high speed.
So, if you’re not that experienced in how to use a Dremel collet, educating yourself on this accessory will help you get better control of the machine.
Dremel Collet Won’t Tighten
It will not only make your job easier, but you will also get a more precise response from the unit.
In addition, it is optimal for the tool, and the collection is integrated with small-sized identification rings all around the shank.
The rings are usually the size of the Dremel’s collet. So, if it won’t tighten up, we have the instructions available for you!
How To Tighten The Dremel Collet?
When it comes down to the Dremel tool, it’s common for them to break down because they don’t age well.

So, you will have to be mindful of their maintenance and don’t hold back on the unit’s cleanliness as you’re trying to set up the device.
It won’t take more than a few minutes to set up the Dremel device. However, if you keep ignoring the maintenance, you’re bound to run into more errors down the road.
It all comes down to the basic hardware status, and you will need to service it on a weekly basis.
After a few years of usage, they go bad, and the collet ends up getting deformed, but there are some ways for you to tighten them up.
So, with the section below, we are sharing how you can tighten up the Dremel collet.

- First of all, if you are using the electrical Dremel, you need to disconnect it from the power connection by taking out the power cord. On the other hand, if you are using the cordless model of Dremel, you only need to hold the battery release tabs on the Dremel’s back and take out the battery from the unit
- When the battery is out, you have to press the shaft lock button and hold it for a longer time (it is usually available on the top of the Dremel). Also, this lock button is an on/off switch available in the form of a small button
- Now, you have to place the collect wrench around the Dremel’s collet nut. Also, the collet nut is defined as the knurled sleeve that surrounds your rotary tool’s collet
- Lastly, you need to turn the collet nut in a clockwise direction with the help of a wrench. Once the nut is tightened up, you can use it as you like. However, you need to be careful about the tuning of the nut because counterclockwise turning will result in a loosened collect, and you don’t want that. So, turn it in the clockwise direction
To provide you with more information, the collet on your Dremel tool is a fine equal to the chuck jaws that you normally see on the standard drill.
In addition, the collet wrench should be put around the collet nut to ensure you have a better grip on it.
In the majority of cases, the collet wrenches are provided with the Dremel tool, but if you don’t have it, you can also purchase your own wrench from the hardware store.
It all comes down to the availability of tools, and tightening up the Collet can be hard because of the collected gunk and debris when you ignore the maintenance.
For this reason, all owners are pointed towards keeping the unit fully maintained over the years.
It will take a bit of time to get used to the maintenance cycle. However, you will need to put in this time and keep track of the system’s hardware to get an optimal response.
There are no quick ways of skipping maintenance, and it will only cost you more time and money in the long run. If you are fine with tightening the collet at home, it’s great.
On the other hand, if you don’t have the technical knowledge, it is better to take your Dremel to the hardware store because their staff is better at fixing these issues, and they will do it perfectly.

Also, they might even give you some tips on keeping the collet tightened for seamless usage. So, be sure to reach out, and you might just save yourself from all of this hassle.
It will only take a minute of your time to call up these experts. From there, you can explain the situation, and they will take charge of the situation.
Hopefully, it won’t come to that, and you will be able to adjust the Collet yourself without any professional support.
Dremel Collet Won’t Tighten
Most of the time, you will not have to worry about any issues while following the steps mentioned above.
So, if you’re struggling with the system, be sure to go through the steps one more time and slowly rotate the spindle to avoid these errors. Ideally, all errors will be fixed right here.
However, if you’re not too sure about the hardware status of the unit, then fixing it will be a bit complicated.
You will have to check the system for debris and jamming issues. There are a ton of issues that can be at play here, and you will have to go through some basic troubleshooting steps to tighten the Collet.
These fixes include cleaning the Dremel, using lubricant, compatibility issues, condition of threads, and the overall hardware status.
So, depending on the current condition of the hardware, you will have to go through quite a few fixes.

All it takes is a bit of effort on your end to figure out the situation. This includes cleaning up the Dremel Collet and making use of the fact that there are no broken sections inside.
Sometimes, a foreign object is stuck, and you won’t be able to turn the spindle properly.
You can rely on a can of compressed air to get through the basic maintenance.
However, if you find that issue to be more related to the spindle, now might be a good time to lubricate it with some WD 40.
You can rely on any lubricant from your local store to get the hang of the situation.

All that you’re trying to do here is make sure that the spindle is able to turn properly to tighten up the collet.
From there, it is not that hard to get the desired adjustment from the unit.
If you’re lucky, all issues should be fixed at this point, and you will not have to bother with more errors.
On the other hand, if you find the threads to be in poor condition or have any other hardware issues, then you will have to leave this job to the professionals.
You will not be able to fix the threads yourself and will have to leave this job to the professional.
It will cost you a bit to get the threads fixed, and you won’t have to struggle as much with tightening up the collet from there.
Hopefully, all errors with the system will be fixed at this point, and you will not have to bother with these errors again.
Wrapping Up
Can’t seem to tighten up the Dremel Collet? Try the steps listed above to get through the issue in no time.
It will only take a bit of effort on your end to fix the system, and you will not have to bother with any errors as long as the Collet is in good shape.
So, be sure to check up on the hardware itself. If you find the hardware to be in bad condition, then you can claim the warranty to get a free replacement.
This is especially true if you believe that you got a damaged Collet out of the box. So, be sure to reach out to the dealer about a claim, and he will take charge of the situation.
From there, you can explain your side and then provide proof of payment to speed up the process. That way, you will have the new system within the same week.

On the other hand, if you’re not sitting on a valid warranty and the unit is in poor shape, try reaching out to the local repair center.
The issues with the threads being worn on the unit can be hard to fix on your own.
You will not be able to get through the issue with basic tools, and reaching out to the experts will save hours of your time.
So, be sure to reach out, and don’t spend hours trying to adjust the system on your own.